


Changing your name on Facebook is simple, but there are a few rules and steps depending on what device you’re using. Whether you want to use a new last name, correct a typo, or add a nickname to your profile, this guide shows how to do it clearly on both desktop and mobile.
Why People Change Their Names on Facebook?
People update their Facebook names for many reasons—after marriage, divorce, legal name changes, or just to fix spelling mistakes. Some also want to add a nickname, birth name, or other variation that shows on their profile.
Facebook encourages users to use their real name, the same one friends call them in real life. Because of this, the platform reviews each name change and may reject names that break its rules.
Change Your Name on Facebook Using a Desktop Browser
If you’re on a computer or laptop, follow these steps to change your name:
- Open Facebook and log in.
- Click your profile icon or the arrow in the top right.
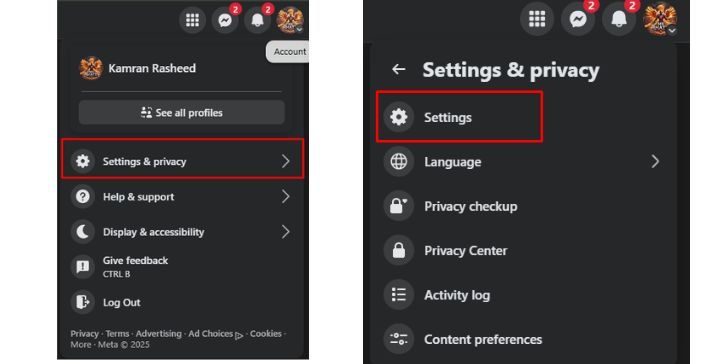
- Choose Settings & Privacy, then Settings.
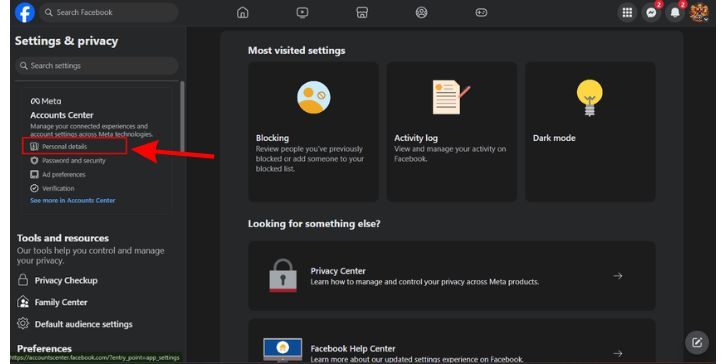
- In the left menu, click Personal Information.
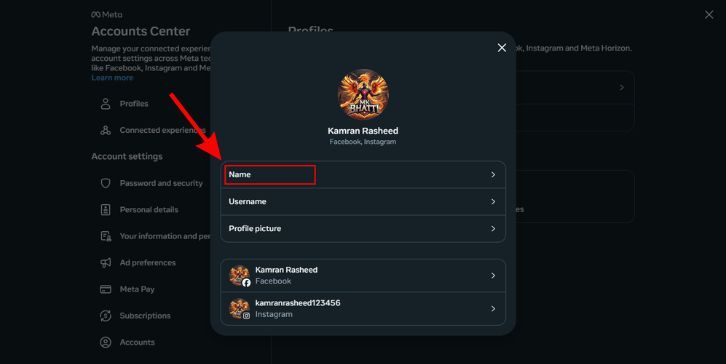
- Choose your profile and then click Name.
- Enter your new first, middle, or last name.
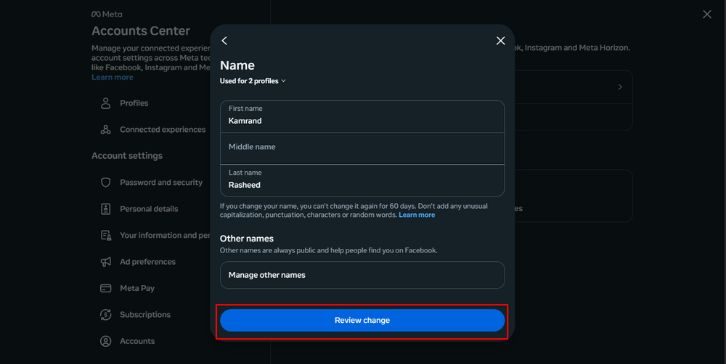
- Click Review Change to preview how it will look.
- Choose how your name appears.
- Enter your Facebook password to confirm.
- Click Save Changes.
Facebook will update your name right away or tell you if it needs more time to review it.
Change Your Name in the Facebook Mobile App
To change your name on a phone or tablet:
- Open the Facebook app.
- Tap the three-line menu (top right on Android, bottom right on iPhone).
- Scroll down and tap Settings & Privacy > Settings.
- Tap Personal and Account Information.
- Tap Name.
- Enter your new name and tap Review Change.
- Choose the display format, confirm with your password, and tap Save.
The steps are the same for Android and iPhone users. You may need to wait a few minutes for the change to show on your profile.
How to Add a Nickname or Other Name to Your Facebook Profile
If you don’t want to change your main name but want to show another name, you can add a nickname, maiden name, or other variation.
Steps:
- Go to your Facebook profile.
- Tap or click About.
- Choose Details About You.
- Tap Add a nickname, a birth name, or another name.
- Select the name type and type it in.
- Check the box if you want this name to show at the top of your profile.
- Save the changes.
These names appear in parentheses next to your main name, like John Smith (Johnny).
Rules for Facebook Name Changes
Before you make a change, keep these rules in mind:
- Your name must match Facebook’s real name policy.
- No symbols, numbers, repeated characters, or punctuation that don’t belong.
- You can only change your name once every 60 days.
- Facebook may ask for ID if the name looks fake or suspicious.
Using fake names, titles (like Dr. or Sir), or anything unusual could get your request rejected.
Name Not Changing? Try These Fixes
If your name isn’t saving or won’t update, check the following:
- Browser/App Cache: Clear cache and cookies or update your Facebook app.
- Wrong Format: Your name might break Facebook’s rules.
- Too Soon: You can’t change your name again if it’s been less than 60 days.
- Mismatch: If your profile has unusual activity, Facebook may block changes for safety.
- Rejected Request: If denied, go to the Facebook Help Center and submit a request.
Facebook might also lock name settings temporarily if your account is under review or flagged.
Final Tip
Changing your name on Facebook is easy once you know where to look. Use your real name or something close to it. For fun or a personal touch, add a nickname that shows next to your main name. Keep things simple and follow the rules to avoid delays.
If this helped you, share it with someone else who might need it. Got stuck? Leave a comment with your question.