


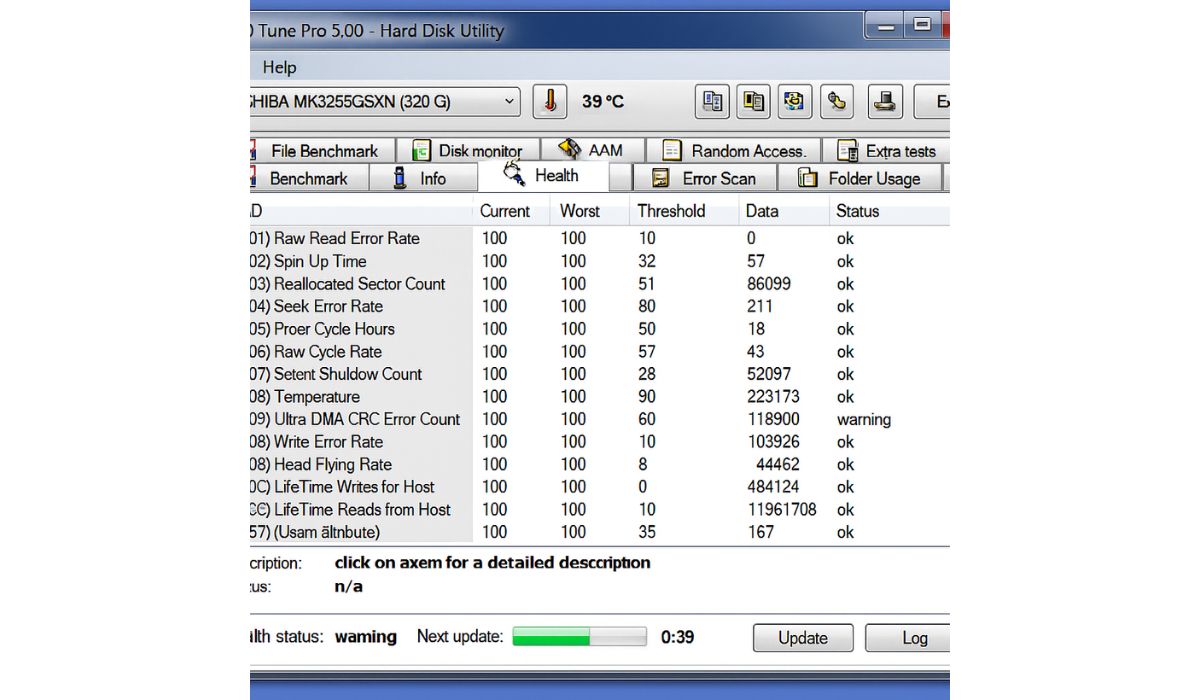
When you run a tool like HD Tune or CrystalDiskInfo, you may see a warning for Ultra DMA CRC Error Count (SMART attribute C7). The number might look huge, and the status may show “warning.” That often scares users into thinking the hard drive is dying.
The truth is, CRC errors don’t always mean a failing drive. Most of the time, they point to a bad data connection — a loose or faulty SATA cable, an unstable port, or even power issues. This guide explains what the error means and how to fix it safely.
What Is UDMA CRC Error Count?

UDMA stands for Ultra Direct Memory Access. It’s a way for data to move quickly between the drive and the system without using the CPU too much.
CRC means Cyclic Redundancy Check. It’s a method to detect errors during data transfers. If the system notices corrupted data coming from the drive, it flags it as a CRC error.
Think of it like static noise in a phone call caused by a frayed cable. The voices (data) are fine at the source, but the bad connection scrambles the signal during transfer.
Causes of UDMA CRC Error Count
Several things can trigger CRC errors:
- Faulty or low-quality SATA/IDE cables
- Loose connections or bent pins on the drive or motherboard
- Bad SATA port on the motherboard
- Damaged external enclosures or USB-to-SATA adapters
- Power supply instability causing interruptions
- Rarely, the drive’s own interface failing
How to Fix UDMA CRC Error Count
You can usually solve this issue without replacing the drive. Follow these steps:
1. Shut Down and Disconnect Power
Start by powering off the computer and unplugging it from the wall or power strip. Leaving power connected while handling drives can risk damage. Also, disconnect any connected USB devices and wait a few seconds before opening the case. A clean power cut reduces the chance of static discharge, which can harm sensitive components.
2. Replace the SATA/IDE Cable
Faulty or cheap SATA/IDE cables are the most common cause of CRC errors. Replacing them often solves the issue instantly.
- Use a new, shielded SATA cable, preferably no longer than 18 inches.
- Stick with known brands rather than generic unbranded ones.
- Avoid very thin, flat cables if possible; round cables tend to last longer.
- Keep cables away from high-power wires like GPU or PSU leads.
- Replace both ends if you’re not sure which one is bad.
Many users find that this step alone prevents the CRC error count from rising further.
3. Reseat the Connection
Loose connectors are an underrated problem. Even if the cable looks fine, one side might not be fully seated.
Steps to do this properly:
- Unplug the SATA cable from both the hard drive and the motherboard.
- Check for dust, bent pins, or signs of wear around the connectors.
- Plug it back in firmly until it clicks or feels locked in place.
- Gently tug the cable to confirm it’s secure.
This takes only a few minutes and rules out one of the simplest causes.
4. Switch to a Different SATA Port
Sometimes the motherboard port is the real culprit. Switching ports can eliminate the problem without extra cost.
- Try a different SATA port on the same controller.
- If available, test on a separate controller (for example, Intel vs third-party).
- Use lower-numbered ports (SATA 0 or 1) since they’re usually more stable.
- Avoid mixing SSDs and HDDs on the same controller if you see repeated issues.
If the error count stabilizes on a new port, the old one may be failing.
5. Test a Different Enclosure or Adapter
If you’re using an external drive, the USB-to-SATA adapter or enclosure can be the weak point.
- Try another enclosure or docking station.
- Swap the USB cable with a new one.
- Plug the enclosure into a different USB port (preferably USB 3.0).
- Test the drive directly inside a PC with a SATA connection.
- Check if the enclosure has its own power supply and confirm it’s stable.
If CRC errors vanish in a new enclosure, you’ve found the issue.
6. Update Drivers and BIOS
Software can play a role, especially on older systems. Updating ensures the controller and drive communicate correctly.
- Update chipset drivers from your motherboard’s support page.
- Install the latest SATA/AHCI controller driver.
- Check for BIOS updates related to storage improvements.
- Run Windows Update or Linux package updates to patch kernel drivers.
Driver fixes are less common than hardware ones, but keeping everything current removes one more possible cause.
7. Monitor the SMART Data Again
Once you’ve applied a fix, monitoring is the only way to confirm success. Tools like CrystalDiskInfo, HD Tune, or smartctl show whether the Ultra DMA CRC Error Count is still increasing.
Check these steps when monitoring:
- Write down the current CRC error value.
- Restart your system and use the drive normally for a day.
- Recheck the value after regular use.
- If it hasn’t gone up, the fix worked.
- If it’s still climbing, test again with another cable, port, or enclosure.
Monitoring makes sure you’re not just guessing — you know if the issue is solved.
After making changes, monitor the SMART data again. If the count stops increasing, the issue is fixed.
Backup Before Anything Else
Even if the drive itself is healthy, it’s smart to back up your files right away. CRC errors mean data didn’t pass through correctly, and that can lead to corrupted files during transfers. Having a backup gives you peace of mind while troubleshooting.
Can You Reset or Lower the Error Count?
No. Once a CRC error is logged, it stays in the drive’s SMART history. The value won’t reset, even if you replace the cable and fix the problem.
What matters is whether the number keeps rising. If the error count remains stable after a fix, your drive is safe to continue using.
When to Worry and Replace Hardware
If the count keeps climbing even after you’ve tried new cables and ports, the issue may be deeper. Possible causes:
- A failing motherboard SATA controller
- Drive electronics starting to fail
- Power supply instability under load
At that point, consider testing the drive on another system. If errors still increase, it’s safer to replace the drive.
Monitoring the Drive Over Time
Once you’ve tried a fix, the only way to be sure it worked is to keep an eye on the drive. Tools like CrystalDiskInfo or HD Tune on Windows, and smartctl on Linux or macOS, can track the Ultra DMA CRC Error Count over time.
It’s a good habit to check the attribute once a week. Write down the number, then come back after a few days of normal use. If the value hasn’t changed, the issue is under control and you can continue using the drive with confidence.
But if the count keeps climbing, it’s a sign something deeper is wrong. That’s when you should think about swapping cables again, testing a different port, or even preparing for a replacement drive before data loss becomes a real risk.
Conclusion
The UDMA CRC Error Count can look alarming, especially when monitoring tools mark it with a yellow warning label. In reality, this error is more often tied to simple connection problems than to a failing drive. A fresh SATA cable and switching to another motherboard port usually resolve the issue in most situations.
It’s always smart to start with a backup. Protect your files before making any hardware changes. Once your data is safe, replace or reseat the cables and confirm they’re secure. Don’t panic if the error value doesn’t drop back to zero. That number never resets — what matters is whether it stays steady after the fix.
Keep monitoring the drive over time. If the count remains stable, your system is healthy. If the number continues to climb, it suggests a more serious hardware issue that may involve the motherboard, power supply, or the drive itself.
Have you already dealt with this error by swapping cables or ports? Share your experience in the comments. It could help someone else who sees the same warning and isn’t sure what to do next.