


Many people build a website on WordPress or another CMS and then struggle with contact forms not sending emails. Messages land in spam, or don’t arrive at all. This guide explains how to connect a SiteGround email account with your website’s contact form. We’ll cover why it matters, what settings you need, and how to make sure your messages reach your inbox.
Why Linking SiteGround Email to Your Contact Form Matters?
When visitors fill out a contact form, they expect you to reply quickly. If your form uses random email servers or free accounts, the message can get flagged by filters. Using your SiteGround domain email improves trust and branding. It shows the sender is connected to your domain and not an outside system like Gmail or Yahoo.
Deliverability also improves because SiteGround gives you control over DNS records like MX, SPF, and DKIM. These records tell services like Google, Outlook, and Apple Mail that your email is safe. A proper setup means fewer errors, less chance of landing in junk folders, and more reliable business communication.
How to Connect SiteGround Email to Website Contact Form?
Short intro: you’ll link your domain email on SiteGround to your site’s contact form. This uses SMTP, not basic PHP mail. You’ll make a mailbox, set DNS (MX, SPF, DKIM), add an SMTP plugin, wire your form plugin, and test delivery to Gmail or Outlook.
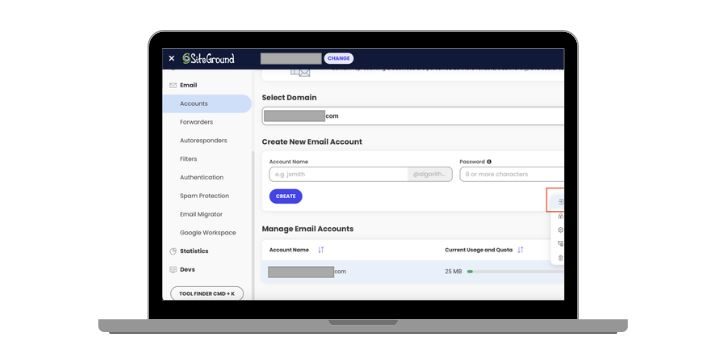
1) Create your SiteGround mailbox (Site Tools → Email → Accounts)
Make an address like info@yourdomain.com. Set a strong password. Open Webmail once to confirm it works. Note these items; you’ll need them later: full email (username), password, mailbox name, and where to view “Mail Configuration” in Site Tools.
2) Find your SMTP details in SiteGround
In Site Tools → Email → Accounts → three-dot menu → Mail Configuration (or Manual Settings), copy:
- SMTP host: usually mail.yourdomain.com (or the host SiteGround shows)
- Port: 465 (SSL) or 587 (TLS/STARTTLS)
- Encryption: SSL/TLS or STARTTLS (pick one that matches the port)
- Authentication: required (username = full email, password = mailbox password)
Tip: the “From Name” can be your brand name. The “From Email” should be your domain email, not a free address.
3) Set DNS so mail passes spam checks (MX, SPF, DKIM, optional DMARC)
Open your DNS where the domain lives (SiteGround DNS Zone Editor or your registrar like Cloudflare, GoDaddy, Namecheap).
- MX: point to the exact MX servers SiteGround lists. Delete old MX records from past providers.
- SPF: only one SPF TXT record per domain. If you already have one, add SiteGround’s include to the same record. If not, add the SPF record SiteGround shows in “Email Authentication.”
Example pattern (do not copy blindly):v=spf1 a mx include:EXAMPLE-SG-INCLUDE ~all - DKIM: enable/toggle in SiteGround. If your DNS is outside SiteGround, copy the DKIM TXT/CNAME it gives and add it at your DNS host.
- DMARC (optional but smart): add a TXT at
_dmarc.yourdomain.com.
Starter pattern:v=DMARC1; p=none; rua=mailto:postmaster@yourdomain.com; fo=1; adkim=s; aspf=s
Notes: - DNS changes can take time to update across the internet.
- If you use Cloudflare, set mail-related records to “DNS only” (gray cloud), not proxied.
- After propagation, Gmail/Outlook headers should show spf=pass, dkim=pass, dmarc=pass.
4) Install and set an SMTP plugin in WordPress
Use WP Mail SMTP (or Easy WP SMTP). In WP Mail SMTP → Settings:
- From Email: your SiteGround address (info@yourdomain.com).
- Force From Email: on (helps match DMARC).
- From Name: brand name (optional to force).
- Mailer: “Other SMTP.”
- SMTP Host: the host you copied (e.g., mail.yourdomain.com).
- Encryption: SSL for 465, TLS for 587.
- SMTP Port: 465 or 587 (match the encryption choice).
- Authentication: on. Username = full email. Password = mailbox password.
Save. If the plugin offers an “Email Test” page, keep it open for step 6.
5) Wire your contact form plugin to that mailbox
Use the plugin you have:
- Contact Form 7: open your form → Mail tab.
- To: the inbox where you’ll receive messages (can be the same address).
- From: your SiteGround address (must be your domain).
- Additional header:
Reply-To: [your-email](so you can reply to the visitor).
- Elementor Forms: in Actions After Submit → Email. Set “From Email” to your domain address. Use dynamic “Reply-To” with the form email field.
- WPForms or Gravity Forms: open Notifications. Set “From Email” to your domain address. Use visitor email for “Reply-To.”
Avoid setting “From” to Gmail/Yahoo. That breaks DMARC and sends mail to spam.
6) Test and fix common errors fast
Send a test from WP Mail SMTP → Email Test to your Gmail and Outlook addresses. Submit your live contact form once. If something fails:
- 535 auth failed: wrong username/password or 2FA/app password issue. Re-enter credentials.
- TLS/SSL mismatch: change port/encryption pair (465+SSL or 587+TLS).
- Timeout or connection refused: some hosts block ports; try the other port.
- Lands in spam: wait for DNS to propagate; check MX/SPF/DKIM; keep “From Email” on your domain; reduce links/attachments in the first test.
- No pass on SPF/DKIM/DMARC: recheck records. Only one SPF TXT. DKIM must match the selector SiteGround gave.
- Logs: enable WP Mail SMTP debug logs. Check your host error logs too.
- Growth options: if you move to Google Workspace or Microsoft 365 later, switch MX to that provider and use their SMTP in the plugin. Zoho Mail works in a similar way.
That’s it. You now send form mail through SiteGround SMTP with domain authentication. Keep records tidy, keep your “From” on your domain, and check test headers once in a while.
Conclusion
Connecting your SiteGround email to a contact form is not just about getting messages. It’s about keeping communication smooth and professional. By creating an email account, setting DNS records, adding SMTP, and adjusting your form plugin, you reduce errors and make sure every lead reaches you.
If you want more scale, you can also use third-party email like Google Workspace or Microsoft 365, but SiteGround email is reliable for most sites. Take time to test, confirm delivery, and keep your records updated. A working contact form means fewer missed opportunities and better customer trust.