


You press the power button on your Lenovo laptop. The power light turns on. You may even hear the fan. But the screen stays black. Or the screen worked a minute ago and now it’s dark. This is a common problem on IdeaPad, ThinkPad, Yoga and Legion laptops. Most of the time the screen isn’t broken. A simple reset often brings it back.
This guide walks you through the fixes from easiest to hardest. Start with the quick checks. Then work down the list until your screen comes back.
Why Your Lenovo Laptop Screen Isn’t Working
A black screen can have a few different causes. Here are the most common ones:
- The screen brightness is turned all the way down
- The laptop is stuck in sleep or a frozen state
- The graphics driver crashed
- Windows is sending video to another display
- A recent update or driver caused a problem
- The battery is drained or the charger is faulty
- The display cable or screen is damaged
Quick Things to Check First
Plug in your charger and let the laptop charge for 15 minutes. A very low battery can stop the screen from turning on. Then press the brightness up key a few times. On many Lenovo laptops it’s F6 or Fn + F6.
Next, shine a flashlight on the screen. If you can faintly see the desktop then the backlight is off. That points to a brightness or hardware issue.
Still black? Let’s go through the fixes.
How to Fix a Lenovo Laptop Screen That’s Not Working
If you are facing this problem then follow these steps one by one. Check the screen after each step. Most people only need the first few fixes.
1. Restart the Graphics Driver
Windows has a hidden shortcut that restarts your graphics driver. Press Windows key + Ctrl + Shift + B all at once. You’ll hear a short beep. The screen may flash. If the driver had crashed this often brings the picture right back.
2. Do a Hard Reset
A frozen laptop can look like it’s off. A hard reset clears the stuck state.
- Unplug the charger and any USB devices.
- Press and hold the power button for 20 to 30 seconds.
- Let go and wait a few seconds.
- Plug the charger back in.
- Press the power button once to start the laptop.
3. Use the Emergency Reset Hole
Many newer Lenovo laptops have a built-in battery. They also have a tiny pinhole on the bottom of the case. It’s often marked with a small battery or reset icon. Unplug the charger. Push a straightened paper clip into the hole for about 10 seconds. Then plug in the charger and turn the laptop on. Check your user manual to find the exact spot on your model.
4. Test With an External Monitor
Connect your laptop to a TV or monitor with an HDMI cable. Press Windows key + P and choose Duplicate or Second screen only. If you see a picture on the external screen then your laptop works. The problem is likely the built-in display or its driver. Back up your important files right away while you can see them.
5. Check the Display Settings
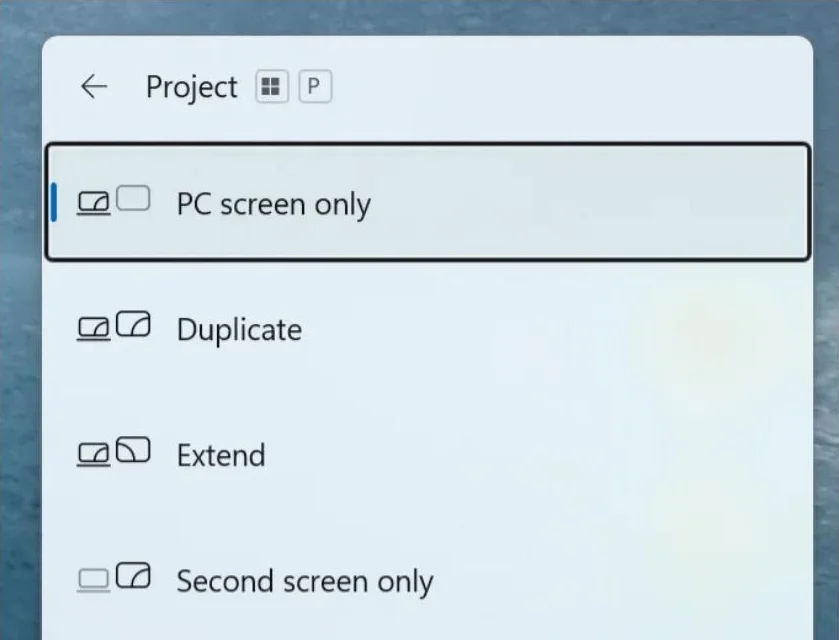

Windows might be sending the picture to the wrong place. This often happens after you unplug a monitor. Press Windows key + P. Use the arrow keys to select PC screen only. Press Enter. Wait a few seconds for the screen to switch.
6. Update or Roll Back the Graphics Driver
A bad driver can cause a black screen after an update. If you can see the screen on an external monitor then open Device Manager. Expand Display adapters. Right-click your graphics card. Choose Update driver. If the problem started after an update then choose Properties instead. Open the Driver tab and click Roll Back Driver.
You can also use the Lenovo Vantage app to install the right drivers for your exact model.
7. Start Windows in Safe Mode
Safe Mode loads only basic drivers. It helps you fix software problems that block the screen. Turn the laptop on and off three times during startup. Windows will open the recovery screen. Choose Troubleshoot > Advanced options > Startup Settings > Restart. Press 4 to start in Safe Mode. From there you can remove a recent update or a new app.
8. Check the Screen in the BIOS
The BIOS runs before Windows starts. If you can see the BIOS screen then your display hardware works. The problem is Windows or a driver. Restart the laptop and tap F2 or F1 right away. Some models use the small Novo button instead. If the BIOS shows up clearly then focus on drivers and updates.
9. Reset the BIOS to Default Settings
A wrong BIOS setting can sometimes stop the display. Open the BIOS using the steps above. Look for an option called Load Default Settings or Setup Defaults. On many Lenovo laptops you can press F9. Save and exit with F10. The laptop will restart with default settings.
10. Run Lenovo Diagnostics
Lenovo has free diagnostic tools that test your hardware. Open Lenovo Vantage and look for the hardware scan. You can also run Lenovo Diagnostics from a USB drive made on another computer. The test checks your display, memory and other parts. It tells you if something has failed.
What If the Screen Still Won’t Work?
If the external monitor works but the laptop screen stays black then the display or its cable may be damaged. This often happens after a drop or after the lid is opened and closed many times. Contact Lenovo support or visit an authorized repair center. Check your warranty on the Lenovo support website using your serial number. You’ll find the serial number on a sticker under the laptop.
How to Prevent Screen Problems
A few simple habits help protect your display:
- Open and close the lid gently from the middle.
- Keep drivers updated with Lenovo Vantage.
- Don’t let the battery drain to zero often.
- Create a restore point before big updates.
- Carry your laptop in a padded bag.
Final Thoughts
When a Lenovo laptop screen is not working the cause is often a crashed driver or a frozen system. Try the graphics driver shortcut first. Then do a hard reset and test with an external monitor. If the external screen works but the laptop screen doesn’t then the display may need repair.
Which fix brought your Lenovo screen back? Tell us in the comments.