WordPress is a powerful content management system used by millions around the globe. One of its hidden engines, WP-Cron, is responsible for handling scheduled tasks like publishing scheduled posts, checking for plugin updates, and running maintenance tasks. However, many WordPress users encounter performance issues due to how WP-Cron functions. If your scheduled posts aren’t publishing or your automated backups fail, your WP-Cron system might be misbehaving. This guide provides a reliable and easy-to-follow method to fix WP-Cron and ensure your website runs efficiently.
What Is WP-Cron?
WP-Cron (short for WordPress Cron) is the default task scheduling system in WordPress. Unlike traditional Unix/Linux-based cron jobs that run at predefined times, WP-Cron runs only when someone visits your website. As a result, low-traffic sites may experience missed tasks, while high-traffic sites may suffer from performance overhead.
Common Issues Caused by WP-Cron
- Missed scheduled posts or tasks
- Delayed email notifications
- Slow website performance at page load
- Backups or scans failing to run
All of these issues stem from WP-Cron’s reliance on visitors to trigger it. Fortunately, the solution is simple and effective: replace WP-Cron’s default behavior with a real cron job running directly on your server.
Step-by-Step Guide to Fix WP-Cron
To stabilize and improve your WordPress site’s performance, you’ll want to disable WP-Cron’s built-in execution and set up a real system cron job instead. Here’s how to do it:
1. Disable WP-Cron Within wp-config.php
Log in to your hosting account or use FTP/SFTP to access your WordPress root directory. Then, find and open the wp-config.php file. Insert the following line of code just above the line that says /* That's all, stop editing! Happy publishing. */:
define('DISABLE_WP_CRON', true);This command disables WP-Cron from running automatically on every page load.
2. Set a Real Cron Job on Your Server
Now that you’ve disabled WP-Cron, it’s time to set a real cron job that will run wp-cron.php at regular intervals. How you do this depends on your hosting environment.
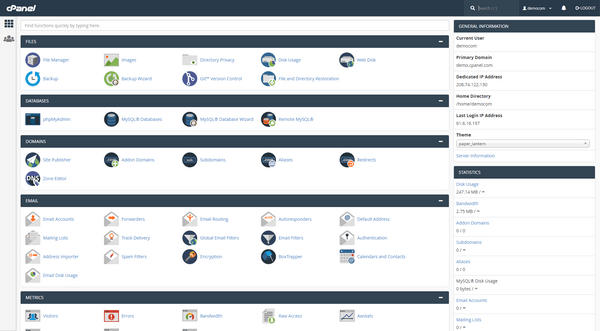
For cPanel Hosting
- Log in to your cPanel dashboard.
- Scroll to the “Advanced” section and click on Cron Jobs.
- Under “Add New Cron Job,” set the execution time. For most sites, setting it to run every 15 minutes is sufficient. Choose:
- Minute: */15
- Hour: *
- Day: *
- Month: *
- Weekday: *
- In the command input box, add this line (replace
yourdomain.com):wget -q -O - https://yourdomain.com/wp-cron.php?doing_wp_cron >/dev/null 2>&1 - Click Add New Cron Job to save your changes.

For VPS or Dedicated Server (via SSH)
If you’re working from the command line, SSH into your server and edit the crontab for your user:
crontab -eAdd the following line (again, adjust the domain):
*/15 * * * * wget -q -O - https://yourdomain.com/wp-cron.php?doing_wp_cron >/dev/null 2>&1This instructs the server to run WP-Cron every 15 minutes reliably, independent of site visitors.
3. Test to Ensure WP-Cron Is Working
To verify that your cron job is working correctly:
- Schedule a post in the near future (e.g., 5 minutes ahead).
- Wait past the scheduled time and check if it publishes.
- Review your hosting logs or cron job email notifications (if enabled) for any execution errors.
You can also use plugins such as WP Crontrol to review and manage scheduled events on your WordPress install. This plugin allows you to see missed or overdue tasks.

Advanced Tips for WP-Cron Management
1. Adjust Cron Frequency Based on Site Activity
While setting the cron to run every 15 minutes is common, sites with extremely low traffic may benefit from more frequent execution. Conversely, high-traffic sites can often run cron less frequently (every 30 minutes or hourly) if tasks don’t require real-time execution.
2. Monitor for Long-Running Tasks
Some plugins add heavy background tasks like backups, reports, or scans. If these tasks hang during execution, they can prevent other cron tasks from running. Use plugins like Query Monitor or WP Crontrol to identify problematic events.
3. Separate Intensive Tasks
If your site runs critical background operations like hourly syncing with external APIs or queuing emails, consider running those tasks via separate cron jobs instead of overloading WP-Cron. You can write custom scripts dedicated to those operations and schedule them separately.
Common Mistakes to Avoid
- Using WP-Cron on high-traffic sites: It can lead to performance issues as it gets triggered frequently.
- Disabling WP-Cron without setting a real cron job: This leads to scheduled tasks not running at all.
- Wrong command syntax in cron: Always test your cron command manually in the terminal to validate it works before relying on it.
Alternate Commands (if wget is unavailable)
If wget is not available on your server, you can use curl or php directly instead:
Using curl
*/15 * * * * curl -s https://yourdomain.com/wp-cron.php?doing_wp_cron >/dev/null 2>&1Using php CLI
*/15 * * * * php /path/to/your/site/wp-cron.php >/dev/null 2>&1Make sure to replace /path/to/your/site/ with the actual path to your WordPress installation.
Conclusion
Fixing WP-Cron is one of the most effective ways to ensure your WordPress site remains reliable and high-performing. The built-in cron system is functional but unreliable for many real-world websites. By disabling default WP-Cron execution and replacing it with a server-level cron job, you’re taking an important step to professionalize your site management.
Whether you’re running a blog, ecommerce store, or a corporate site—reliable task scheduling matters. A fixed WP-Cron ensures that updates, backups, and automated tasks run exactly when they should, giving you peace of mind and a more stable system.
Follow the steps outlined above and monitor your site’s performance and mission-critical tasks more confidently. Reliability starts with proactive configuration.


