
Importing a WordPress theme on Bluehost is a straightforward process that allows you to customize the appearance and functionality of your website. Whether you’re using a free or premium theme, this guide will walk you through the steps to upload, install, and activate your chosen WordPress theme on Bluehost.
Preparing to Import a WordPress Theme
Before importing a theme, ensure that your setup is ready to go:
- Access Your Bluehost Account: Log in to your Bluehost account and navigate to the WordPress dashboard.
- Download the Theme File: Make sure you have the theme’s ZIP file downloaded from the official source.
- Back Up Your Website: Create a backup of your current site to avoid any potential data loss during the process.
Having these steps completed ensures a smooth import process.
Importing a WordPress Theme via the WordPress Dashboard
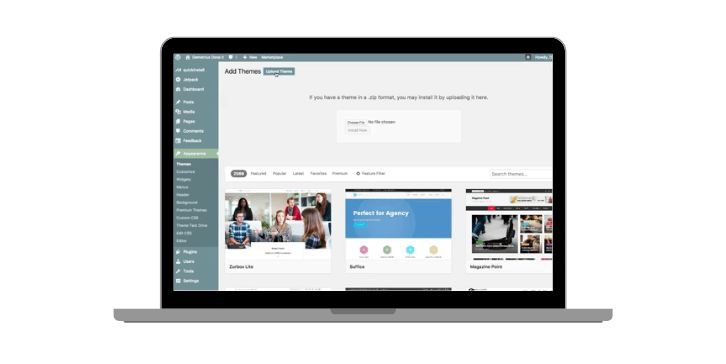
Using the WordPress dashboard is the most user-friendly method for importing a theme:
- Log in to your WordPress dashboard through Bluehost.
- Navigate to Appearance > Themes > Add New.
- Click the Upload Theme button and choose the theme’s ZIP file.
- Once uploaded, click Install Now and wait for the installation to complete.
- After installation, click Activate to apply the theme to your website.
This method is ideal for beginners and works seamlessly for most themes.
Uploading a WordPress Theme Using cPanel
For advanced users or when facing issues with the WordPress dashboard, you can upload the theme using Bluehost’s cPanel:
- Log in to your Bluehost account and access cPanel.
- Open the File Manager and navigate to public_html/wp-content/themes.
- Upload the theme’s ZIP file to this directory.
- Extract the ZIP file by right-clicking on it and selecting Extract.
- Return to the WordPress dashboard and navigate to Appearance > Themes to activate the newly uploaded theme.
Using cPanel provides greater control and is useful for troubleshooting theme upload issues.
Tips for Customizing Your WordPress Theme
Once your theme is successfully imported, you can start customizing it to suit your needs:
- Use the WordPress Customizer to make real-time changes to your site’s layout, colors, and typography.
- Install recommended plugins that enhance the functionality of your theme.
- Consider creating a child theme if you plan to make advanced customizations, ensuring updates don’t overwrite your changes.
- Test all changes in a staging environment provided by Bluehost to avoid affecting your live site.
Customization ensures your website reflects your brand and goals effectively.
Troubleshooting Common Issues
Sometimes, you may encounter problems while importing a WordPress theme. Here’s how to resolve them:
- File Upload Errors: Ensure the theme file is in ZIP format and compatible with WordPress.
- Activation Issues: Verify that all theme files are correctly uploaded to the themes folder in File Manager.
- Broken Themes: Check for missing dependencies or update your WordPress version to the latest release.
Large File Sizes: Increase the PHP upload limit via cPanel or contact Bluehost support for assistance.
These steps can help address most common issues quickly.
Conclusion
Importing a WordPress theme on Bluehost is a simple process that can be done through the WordPress dashboard or cPanel. By preparing beforehand, troubleshooting effectively, and customizing your theme, you can create a website that stands out. Always back up your site and test changes to ensure a seamless experience.
Have questions or additional tips about importing WordPress themes? Share them in the comments below!


