If you are a digital marketer or online business owner, you need to update with everything that can affect online marketing industry. It doesn’t matter what type of online business you have a personal site, an e-commerce website or a small business site, and it’s important to understand how your website users are interacting with your website.
If you are using the old technics of injecting the java scripts and tags on your website. Then your users may have to suffer from slow website loading speed or slow page load speed. Which can cause you more bounce rate and a big dent on your business? To overcome this, you can use the Google Tag Manager.
The Google Tag Manager is one of the most accurate and easy to use solution for all the webmasters around the globe. If we talk about that time when Google Tag Manager or GTM (in short) was not available. We need to add many java scripts, social buttons, Ad scripts to make them load and work on our website. But with the help of Google Tag Manager. We can make all those scripts run without putting them in the website code.
Here in this blog, you will learn how to add “Google Tag Manager” easily on your website. By which you can manage all your website scripts and tags from a single place.
Getting Started: First, you need to have a google account to get the GTM code for your website. GTM works straightforwardly. You need to add GTM code on your site, and you can start managing all the site tags like Analytic Scripts, AdWords conversion tag, AdSense Script from Google Tag Manager interface.
There are some terms you need to be friendly about when you are going to use the Google Tag Manager:
- Account: The name of the account.
- Container: Basically, Website Name.
- Tags: Within the container, you will create different tags and manage them accordingly with the interface.
- Rules: Rules are the condition you can use the trigger your tag.
Here are some steps you need to follow for getting the Google Tag Manager code for your website.
1) Log-In to Google Tag Manager using your google account.

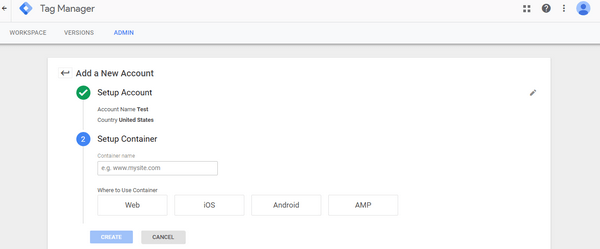
2) Create an account by clicking on create account button given in the top right corner.

3) After that, you can choose where you are going to use that specific container like for Web, iOS, Android or AMP. Choose the Web for your website and agree with the terms and services.

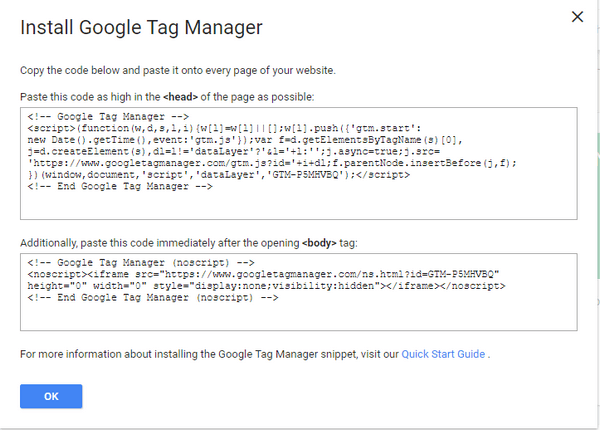
4) Click on save to get the codes for your container. You need to add these codes to your website. The 1st code will be added as high in the <head> of the page as possible and the other on will be added immediately after the opening <body> tag.

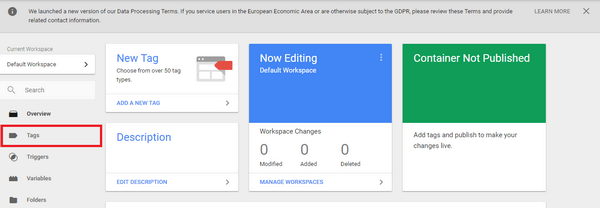
5) After adding the code on your website click on the “Add A New Tag” or tags button given into the left sidebar to start using Google Tag Manager.

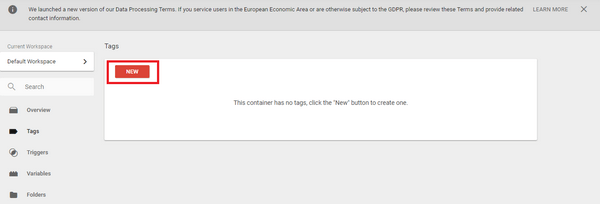
6) Click on the “New” button to create a tag and put conditions accordingly to use it.

7) After modification in tag don’t forget to submit and publish changes to make those tags trigger on your website in selected conditions.

Some Reasons Why Using Google Tag Manager Is Beneficial
Easy to Use: Using google tag manager is smooth and comfy. You need to add the code once in the website. You are now able to manage every single script that you want to inject on your web pages without modifying the website code.
Boost the Implementation Speed: By using GTM, you can speed up many processes like changing and modifying the tags will be no more hectic. It helps to boost the launch by testing the changes itself and deploying when everything is ready to go.
More Protection: With Google Tag Manager you are now overcome with the security and site malfunctioning issue. By GTM you can control all the access of all your accounts like Analytics and Search Console also revoke them anytime you want.
Accessibility: If you are not from a technical background, then Google Tag Manager is the perfect solution for your problems. For using Google Tag Manager, you don’t have to write a single line of code to create and trigger tags. As GTM is a free tool. You can find many blogs available around the internet for any problem you might be stuck.
Debugging: Google Tag Manager has a built-in debug feature that allows you to test and debug every change you did on the tags. It is an extraordinary feature to see how those modifications in tags working without risking about how it will be visible when you put them on the live website.
Fully Control on Modifications: Google Tag Manager comes with a built-in version controller. Every time you modify any tag or change it, GTM will create a new version and which will be archived. So anytime you need to rollback those changes you can do it easily by selecting the previous version.
Wrapping Up
That’s it for now, and We think it helps you decide to use this fantastic tool. Using Google Tag Manager is an easy to use solution to control codes in one place. If you want to track more complex scripts, you must have to invest more time in reading guides and blogs about GTM’s various uses, or you can contact any good digital marketing agency to handle all the website tracking stuff.
Author Bio
Cibirix Digital Marketing Agency is a place where we offer digital marketing and web design solutions to our clients through constant innovation and thought leadership. We want to continue providing digital products, services, and solutions that catapult businesses forward.


Comments are closed.