Installing WordPress is the first step to a beautiful and functioning website. However, that’s not where things end but rather begin.
In this post, we’re going to cover a few things. We will talk about the initial list of things you’ve to do immediately after installing WordPress, prior to starting posting blog posts or doing anything else.
Secondly, we will cover things you need to keep in mind for the site to attract visitors.
All things to note for the website to be properly optimized before going live.
1. Add a Favicon to Your Website
In this section, we’re going to discuss what a favicon is and its importance.
A Favicon adds identity to your website.
It appears just before your website title in your browser. As more and more people visit your site they begin to subconsciously associate the icon with your site.
It’s a stepping stone towards building brand identity and trustworthiness. A lot of websites forget about this and tend to stick with the default favicon which is often one that’s provided by their hosting company’s. For instance, if your site’s hosted with Bluehost, the default favicon will be that of Bluehost.
Here’s how to add one.
Go to Appearance> Customize and click on the option that says Site Identity.
![]()
You will find an option to upload the favicon. Click on select file, choose the image and upload. You can preview the icon and cut it to show a small section if that’s what you want. That’s about it.
Can you guess which is the favicon in the image below?
![]()
2. Add a Contact Form

Websites need a contact form and it’s one of the most common pages you find on sites all over the world. With a blog or website, you might want leads to ask you questions and contact you quickly. A contact form helps with that. And despite all the iterations that WordPress had over the years they skimped on adding a default contact form. Some themes come prepacked with contact us pages. For everyone else, there are plugins to help.
At this juncture, you can use something like Contact form 7. It’s free to use and extremely popular among WordPress users. Gravity forms is another alternative. It’s not free though and costs an annual payment of $59.
3. Carry Out the Basics of Search Engine Optimization

SEO is what new site owners engage in to get a higher share of Google’s search engine pie. It’s free traffic essentially, raining money, leads, and conversions for next to nothing.
And WordPress is one CMS that makes things easy on that end for you. There are pre-built functions that help you with so much of on page SEO optimization. There are different types of permalinks you can use, categories and tags and so much more.
I used to recommend Yoast earlier but now no longer recommend the Yoast plugin. The plugin is by far the best we’ve seen but messes up your on-site SEO and can even de-index sites for no particular reason. The plugin automatically indexes images (has happened more than once) which can Google to think that the site has added thousands of pages overnight with little content causing rankings to tank.
Instead, rely on All in One SEO. It’s easy. It’s free and perhaps it’s all you need.
4. Install Google Analytics

Google analytics is the best analytics tool out there that tops the list of both free and paid tools. It gives insights into your visitors and tells you exactly what they’re doing on your site. With analytics, you get to know which content is most popular and what drives clicks and pageviews.
Armed with the insights you can write posts that get more traffic, more conversions and simply resonate well with your site.
WordPress makes it easy to install the code with the help of the plugin called MonsterInsights.
5. Use Caching
Caching reduces server loads on a website and improves the speed with which sites load.
Most available caching plugins are free to use.
Do note that sometimes when updating plugins you should temporarily deactivate caching as its known to interfere with updating.
Your site’s speed will improve and combined with other little tweaks you can make it much more speedy.
6. Spam Proof Your Site

Never run a blog without the essential plugin called Akismet. Spammers have access to specialized tools like Scrapebox that can both identify a target list of sites and post comments to them automatically. The only goal is to maximize the number of backlinks to their link. Also most times some of these sites are full of malware. Linking out to such sites can hurt search engine rankings and make Google lose their trust. Enabling comment moderation blocks all comments from going live.
Install and activate the Akismet plugin. Most WordPress installations would already have it installed and activated considering the gigantic comment spam problem that WordPress blogs combat on a daily basis.
7. Remove Default Content
There’s always default content, default category and default plugins that WordPress comes with. Delete the hello world blog post, sample page, and sample comment. Also, delete the “hello dolly” plugin. It’s of no use. Finally, change the default post category from Uncategorized to something else. The Uncategorized makes you look like an amateur.
8. Add Sites to the Ping List for Faster Index
WordPress’s default settings have a ping option and they ping to one site when a post goes live. You could add more services and sites. In order to do that go to settings>writing and copy paste the following list.
- http://blogsearch.google.com/ping/RPC2
- http://bblog.com/ping.php
- http://bitacoras.net/ping
- http://blog.goo.ne.jp/XMLRPC
- http://blogdb.jp/xmlrpc
- http://blogmatcher.com/u.php
- http://bulkfeeds.net/rpc
- http://coreblog.org/ping/
- http://mod-pubsub.org/kn_apps/blogchatt
- http://www.lasermemory.com/lsrpc/
- http://ping.blo.gs/
- http://ping.bloggers.jp/rpc/
- http://ping.feedburner.com
- http://ping.rootblog.com/rpc.php
- http://pingoat.com/goat/RPC2
It’s as simple as that.
9. Change Permalink
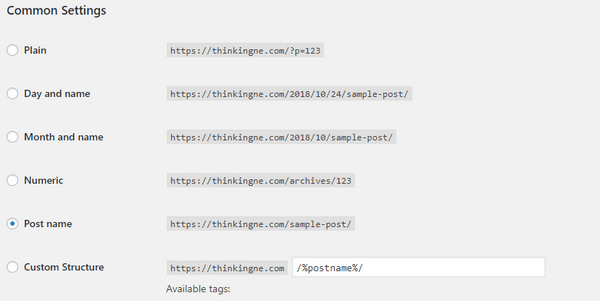
The default option for permalinks isn’t SEO optimized and instead is something like this.
http://yourdomain.com/p=123.
Even outside the realms of SEO such a URL gives little idea to visitors on what the post’s going to be about.
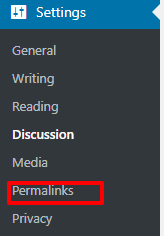
In order to change this go to settings choose permalink and choose one from the list of available options.

I generally choose the one that says Post Name. After that, once you’re satisfied with your choice click on save. You’re done.

10. Create a Custom Menu
Most WordPress themes have a habit of creating their own custom menus and place their links all over the place. While this can be acceptable in some instances, in most cases you need your own menu so that people visiting the site are able to navigate with ease.
Go to Appearance to find the Menus option and then create a custom navigation menu. You can list pages or certain blog posts under this and change the placement from the top sidebar to bottom or right or left.
Conclusion
What do you think of the things you need to do after you installed WordPress
Author Bio
George blogs at ThinkingNE which he started to share the latest and best in marketing and Conversion Rate Optimization.


Comments are closed.