
You are planning a massive gig for your audience? Wondering how to sell tickets to your audience across the world?
Well, there are many ways:
- You can visit third-party services like StubHub and Ticketmaster, but you might have to pay hefty commissions to these services and cut your profits.
- You can create a separate landing page with a CTA that allows your audience to purchase tickets. While this is a good approach if you are hosting a single event, it can be a menace if you want to sell multiple gigs from your website.
- You can turn to social media to sell the tickets and facilitate ticket sales on the platform to reduce friction for the customers. But as you know, social media is a competitive world, and for a newbie, it can be challenging to reach an audience instantly.
All these methods are great and have their pros and cons. But what if you add another very underrated way of selling tickets to your events? I’m talking about WooCommerce.
Ecommerce has worked wonders for many industries, and with WooCommerce, every business person wants to sell anything online. Even the tickets to your first gig. This article will share how you can use a WooCommerce store to sell the tickets to your WooCommerce store.
Why WooCommerce?
The straight answer is WooCommerce is fantastic, and it’s not me; the numbers speak so.
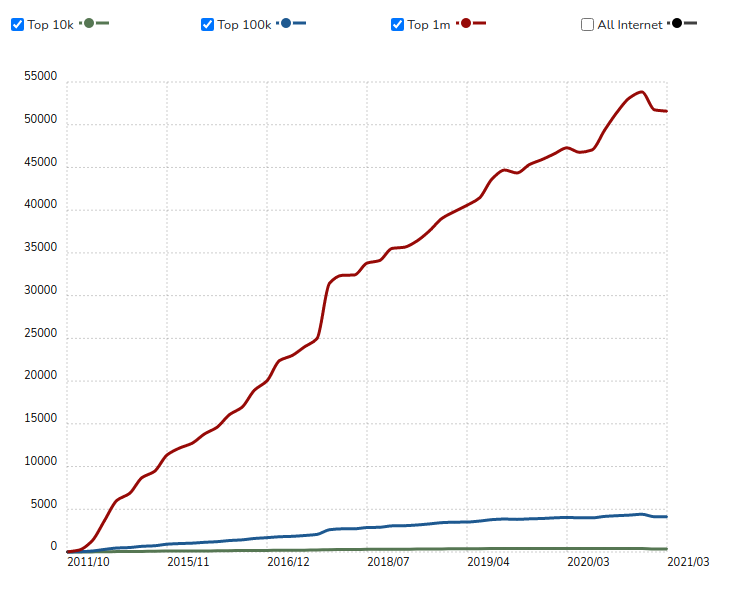
According to a report by BuiltWith, 4,414,537 live websites are using WooCommerce. So many sellers couldn’t go wrong in choosing a platform to run their business. But still, let’s see some factual information as to why you should WooCommerce for selling online:
1. WooCommerce Is Free
So actually, WooCommerce is a free and open-source WordPress plugin; therefore, it is accessible to anyone who owns a WordPress website.
WordPress is the most popular content management system in the platform, and it provides direct developmental support to the WooCommerce plugin.
2. Comes With Built-In eCommerce Features
WooCommerce gives you all the features required to create a full-functioning eCommerce website, therefore, saving you from all the efforts of building custom product pages.
Here are some of the promising features of WooCommerce:
- Unrestricted customization.
- It comes with a built-in blogging system.
- The product categories are easy to manage in WooCommerce.
- You can quickly know your customers’ feedback with the help of reviews and ratings.
- The product can be quickly sorted and filtered with the help of tags and attributes.
- You can make customizations according to the region you’re selling in for currency, taxes, and other details like measurement units.
3. Flexibility To Sell
WooCommerce store owners are free to sell anything and everything from their eCommerce stores. The default WooCommerce store lets you selling the following types of products:
1. Simple Product
A stand-alone physical product that might have to be shipped to your customers is known as a simple product. For selling a simple product, you have to assign a price and SKU for the product and start selling them.
Example: books
2. Grouped Product
A cluster of simple products clubbed together to form a single entity is known as a grouped product in WooCommerce. The grouped products are identified by their child products that have unique features of their own. One of the best examples for a grouped product can be a t-shirt available in muted colors.
3. Virtual Product
With WooCommerce, you can even sell non-physical entities. Unlike the simple and grouped products, there is no need to ship virtual products. For example, you can list services as a product in your store.
4. Downloadable Product
Similar to virtual products, the downloadable product need not be shipped. These products are available as a downloadable file to the customers with a specified path and URL.
5. External/Affiliate Product
Products that you are not the actual seller for comes under the external/affiliate product. The products listed on your website but the customers are directed to somewhere else for completing the checkout process fall under this category.
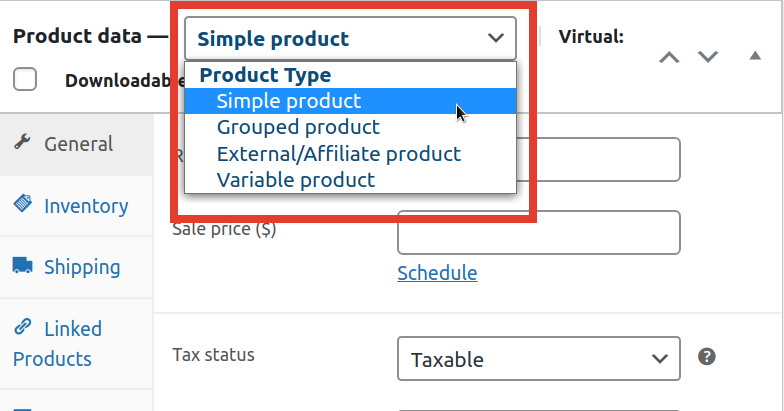
As you can see with WooCommerce, you can sell almost anything from an eCommerce website. However, you can extend the functionality of WooCommerce with the help of plugins and introduce a new product that you will use in the case of events. Moving forward, we’ll see how you can extend the functionality of core WooCommerce and add events as products on your WordPress site.
How to Add Events as Products to My Woocommerce Store?
Let’s begin with the most awaited part of this article and learn step-by-step how to create an event and ticketing website using WooCommerce.
Ready to sell your first gig?
Step 1: Creating a WooCommerce Store
To sell events from WooCommerce, you first need to have a WooCommerce store. Creating a WooCommerce store is very detailed, and if it is your first, you might need a WooCommerce setup tutorial.
But I’ll take you through all the necessary steps to make and the prerequisites for creating a WooCommerce store.
1. Purchase a Domain Name and Hosting Service
The very first step is to purchase a unique domain name which will be your website’s address on the internet. Then, you have to buy a hosting service that will make your website accessible to the searchers.
Instead of a standard hosting service, you can go with a WordPress hosting service provider such as Hostinger.
The advantage of a WordPress hosting service is that you get pre-installed WordPress thus, making it for you to start your website with a click.
Lastly, you’ve to invest in an SSL certificate, but you can skip this step if your hosting provider has already done it for you.
2. Installing WooCommerce
Once you finish that setting up your WordPress website, you have to install WooCommerce. It is similar to installing any other plugin in your WordPress environment.
Just trace the following steps:
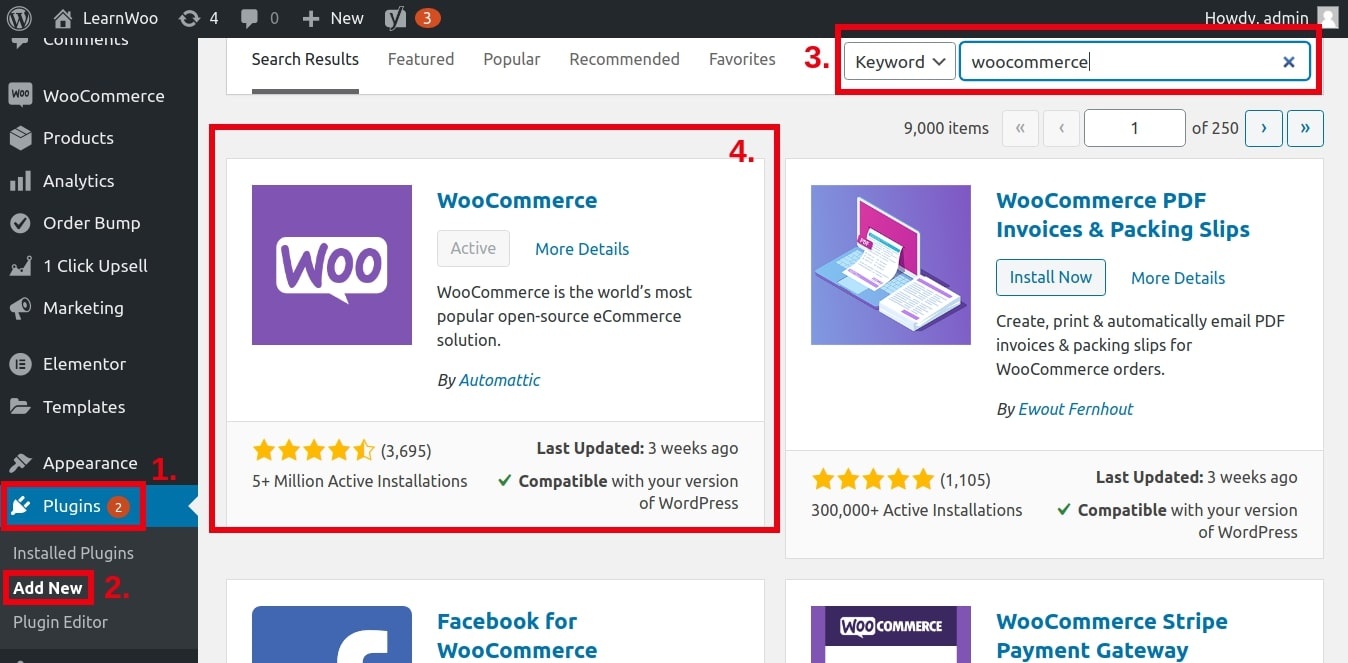
- On your WordPress dashboard, press on the Plugins → Adds new from the side menus.
- In the search bar, type WooCommerce and from the search results, press on the install button beside the WooCommerce plugin.
- Once you’ve installed WooCommerce, activate it and move forward with other procedures.
3. Configuring Essential Settings
Once you activate WooCommerce, it will ask you to fill in some vital information for starting selling online.
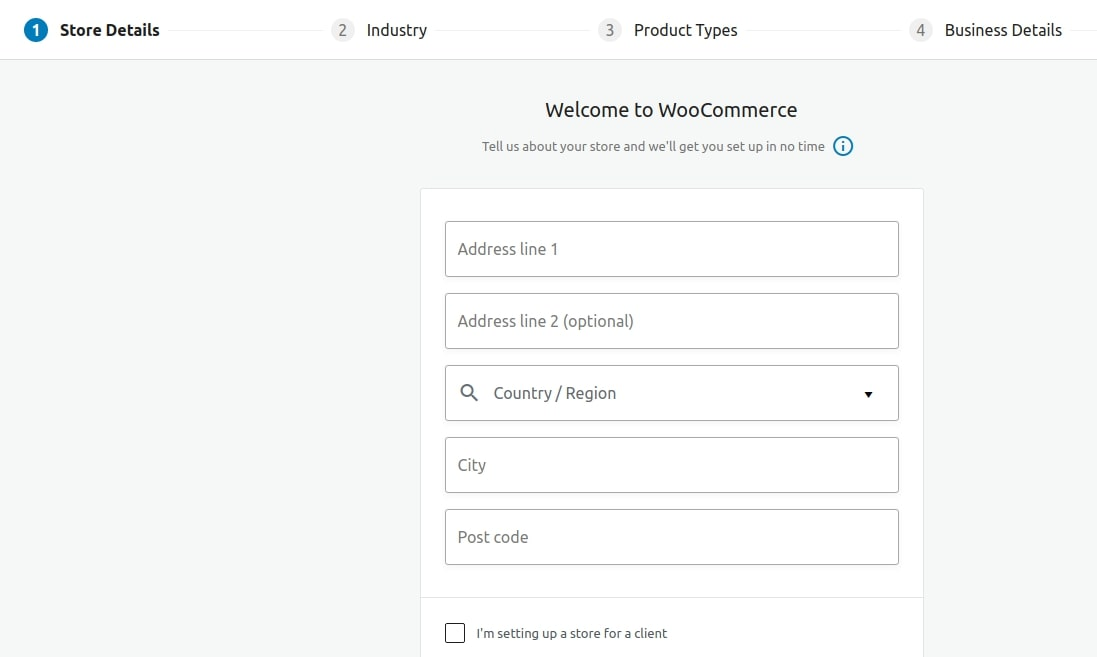
These configurations include:
- Store location, currency, and product type.
- Next, you’ve to choose a payment method. If your payment method is not available, you can skip this step and add a payment method later.
- After choosing a payment method, WooCommerce will ask you to select a shipping method.
- Lastly, the setup wizard will ask you to install some recommended services. If you want any assistance, you can install them or skip this step too.
As I’ve said earlier, the features have to be extended to add a product type that is not available in the stock WooCommerce. Once you have installed WooCommerce and do all the necessary steps, you must add products. In this case, those are events. Let’s see how.
Step 2: Installing Event Tickets Manager for WooCommerce
By default, WooCommerce does not have a feature to add events as products. But we can always turn to plugins for achieving our plugins. So after installing WooCommerce, the next step is to install a plugin called Event Tickets Manager For WooCommerce.
You have to use the same process to install the which you used to install WooCommerce, or you can directly visit WordPress.org, download the plugin and activate it.
Wasn’t it simple?
Installing his plugin will open your routes for selling events from a WooCommerce store. Therefore, our next step is to add your gig for selling the tickets online.
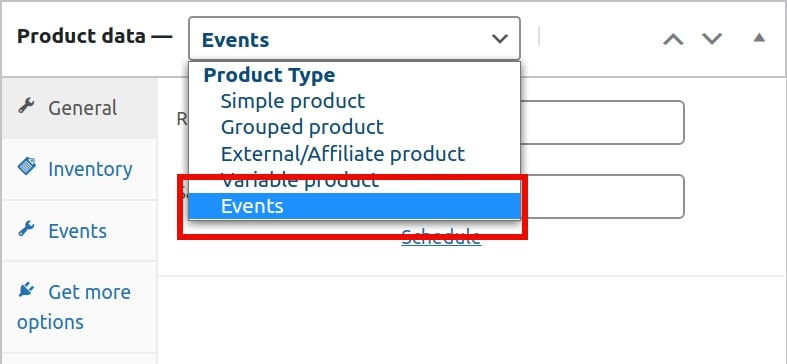
Step 3: Adding Events to Your WooCommerce Store
Like any other product, you have to add events as products if you want to sell them. Trace the following steps to add events on your WooCommerce store:
- Visit the Products → Add New page to upload your first gig.
- Upon visiting the page, scroll down to the product data box section.
- You’ve to select Events as product type from the drop-down menu.
- Finally, you have to start filling in the required details.
The event-based products require the vendors to fill in some essential details before your gig goes live. These events include:
1. Price
The vendor has to enter the price of the tickets for your gig. You’ll find two fields in the pricing section: Regular price and Sale price; if the tickets are at a discount, you’ve to enter expenses in both these fields. You can leave the Sale price field empty if there is no discount available.
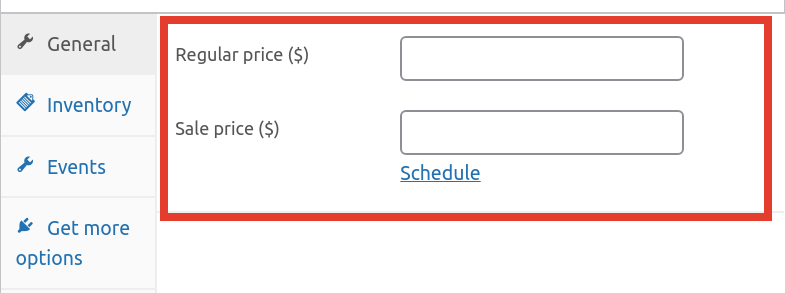
By clicking on the Schedule button below, you can fix the start and end date of the sale. This lets you build a sense of urgency among your customers.
2. Date and Time
Select the Events tab in the product box, and you’ll find some vital information to be filled in, such as the start and end date along with the timings of the event.
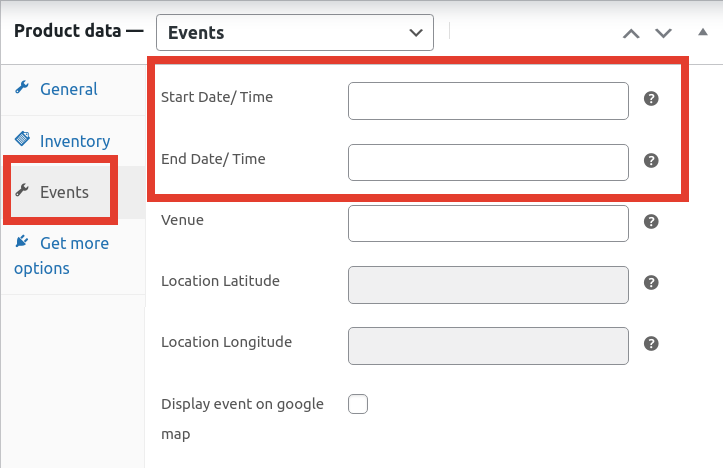
The vendor has to enter the date and time of the gig for the audience.
3. Location
If you’re inviting people to an event, you cannot keep the location hidden. Therefore, the Event Tickets manager asks the vendor to enter the location of an event. The merchant has to enter the exact locational address, and the plugin will automatically generate the longitude and latitude related to the location.
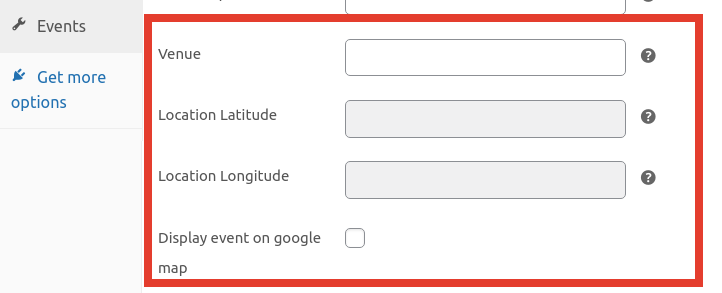
You can also show the gig’s location on the product page by clicking on the checkbox beside “Display event on google map.” The plugin offers integration with Google Maps that lets the merchants show the live location of the event through a widget.
Step 4: Configuring the Ticket Settings
When customers visit your store and book a seat at your gig, they receive the tickets in an email. The WooCommerce plugin has some settings that you have to configure to ensure the guests receive correct emails.
The Event Tickets Manager lets you modify the subject and body of the emails sent to the customers whenever they purchase your WooCommerce store. Customers can find the ticket settings on the MakeWebBetter → Event Tickets Manager For WooCommerce page, and finally, click on the Ticket Setting tab.
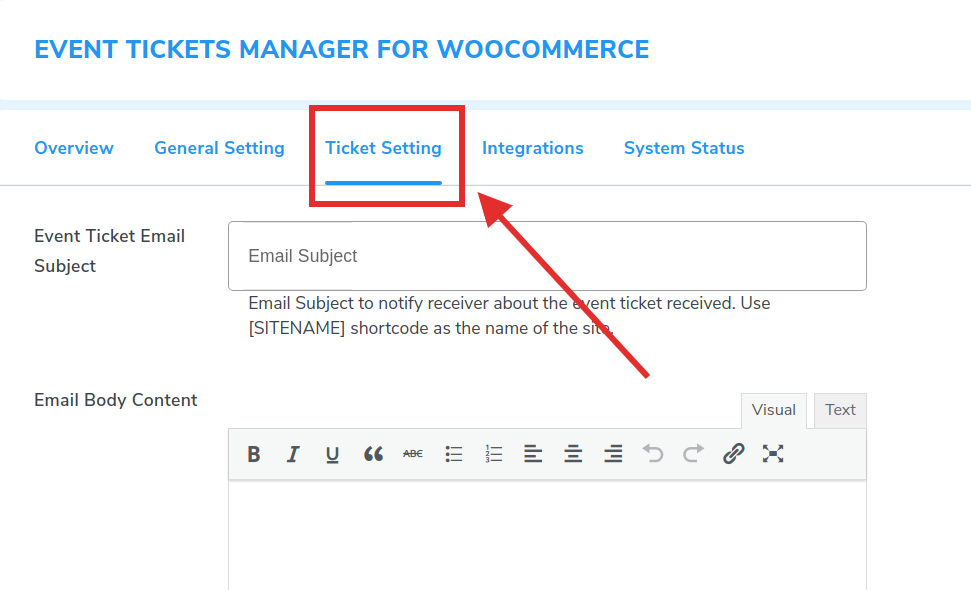
Under the ticket settings tab, you’ll find the options to:
- Edit the subject line of emails and automatically send it when a customer purchases a ticket.
- You’ll also find an editor that lets you edit the content of the email’s body. Thus, letting you make personalized content in a breeze.
- Also, you have an option that allows the merchants to upload an image used as a logo for an email template.
Once you’ve configured the emails, don’t forget to save the settings.
Step 5: Show Live Location of Your Gig
I love Event Tickets Manager For WooCommerce and show the live location of gigs. We don’t want our attendees to get lost or face any problem finding the event’s exact location. Therefore, the plugin has a feature that shows the live location of your gigs on the product pages.
This WooCommerce event management system offers integration with Google. The merchant has to generate an API key and later update the key on the MakeWebBetter → Event Tickets Manager For WooCommerce → Integrations page.
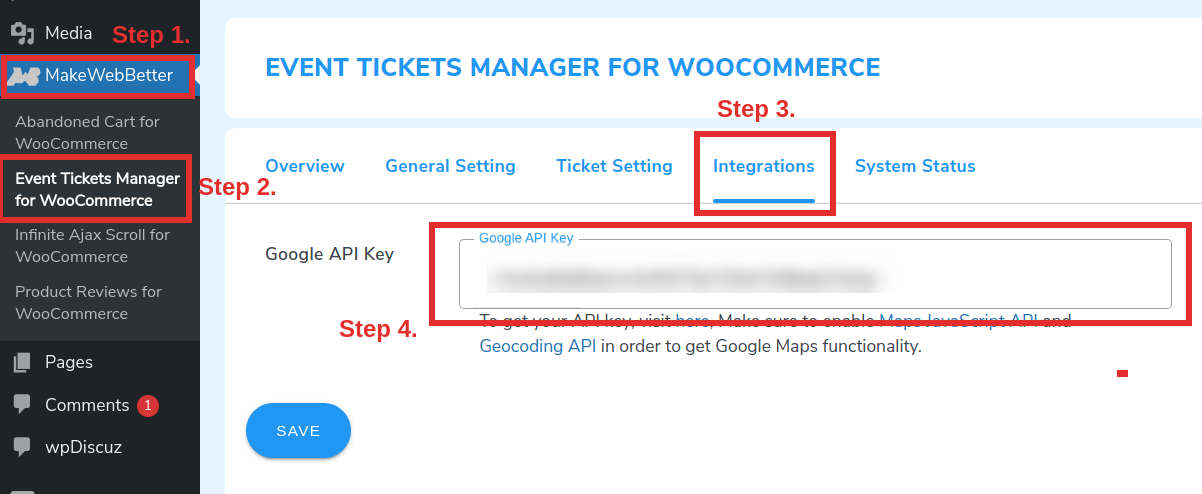
Once you’ve entered the API key, visit the page product editing page and enter the location using the steps mentioned above in Step 3.
Consequently, you’ll see the live location of your gigs on the product page within a widget.
Step 6: Managing the Ticket Stocks
If you are aware of WooCommerce inventory management, you’ll know that the eCommerce platform provides an option for every product to enter the stock quantity.
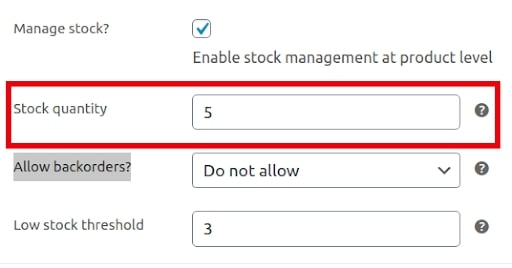
In this case, the stock quantity defines the number of seats that are available for your event. You can also set the threshold for low stock and take advantage of the feeling of urgency to sell your tickets.
For a quick overview of all things, you may look at the plugin documentation and follow all the steps easily.
Let the Party Begin!
So this is all how you can sell your first gig with WooCommerce. Wasn’t it easy?
The Event Tickets Manager For WooCommerce is an extension that has it all. From selling the tickets to your audience to managing the sales in your store. Indeed it is a complete event management solution that automates most of your marketing efforts and lets you focus on the big day.
This WooCommerce extension simplifies the highly complex task of event management and lets you coordinate and plan all the details. I hope this article was helpful and gave you an idea of using an overrated platform to sell a very underrated product with eCommerce power.
Don’t forget to invite us to your first gig!
Author bio- Himanshu Rauthan is an entrepreneur, Co-Founder at MakeWebBetter, BotMyWork, and the Director of CEDCOSS Technologies. He has worn many hats in his career – programmer, researcher, writer, and strategist. As a result, he has a unique ability to manage multi-disciplinary projects and navigate complex challenges. He is passionate about building and scaling eCommerce development.
Email address linked with Gravatar account- himanshurauthan@cedcoss.com
Twitter profile URL
LinkedIn profile URL


Comments are closed.