
Despite it being famous for quite a few years now, eCommerce is still a rapidly growing industry. Setting up an online shop of our dreams can be a great side business, but it can also turn into a lucrative career in due time.
Thanks to many pre-optimized themes, and tools, it’s become relatively easy to create the bare bones of a store and start selling products. An appealing design is always your top priority. It makes the site seem more trustworthy and is overall more likely to draw in customers.
However, many other aspects can make or break an eCommerce business. Poorly handled shipping is the number one spot on that list. Not only does it hurt your bottom line, but terrible shipping policies can also have catastrophic consequences when it comes to customer satisfaction. Let’s take a real-life example.
Many brands advertise free shipping; you see it, fill up the cart and proceed to checkout. Only to find out later that shipping to your country is actually near the sum cost of the products you purchased – never going back there again.
If you’re using WooCommerce, there are plenty of plugins that can aid you in getting shipping rules straight. Still, if you have an international customer base and need specific shipping rules for different products or quantities, we suggest you try out the WooCommerce Table Rate Shipping plugin.

How to Setup Shipping Based on the Number of Items in the Cart
Well, first things first. You’ll have to install the plugin to your WordPress by either downloading it straight from the “Plugins” tab or using other provided resources. Add the License Key, and commence installation. After that’s all fine and dandy, you can go on and start to create a new shipping method.
So, let’s jump into our WordPress admin panel. Under WooCommerce, jump into “Settings” and navigate to the “Shipping” tab located on the top of the page.
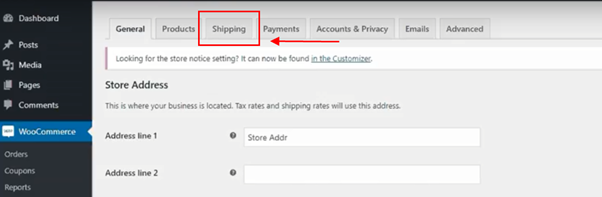
The first you’ll have to do to get the store up and running is adjust a shipping zone. Now, if you’re an absolute beginner and aren’t yet familiar with the ins and outs of running a shop, feel free to peruse the knowledge base and get acquainted with that first. Don’t worry. It’s not as hard to understand as it seems at first. You’ll get the gist of it in a manner of minutes.
Click on “Add Shipping Zone,” and you’ll be ready to begin. Name the zone ( for clarity, use something recognizable and clear like the US, for the United States), and select a country where this method will apply. Upon clicking “Add Shipping Method,” pick Table Rate Pro from the dropdown menu.

Once you select the plugin’s name, hover over it, and navigate to “Edit.” Add your first shipping method, and enable it. You will be using it to ship your products correctly after all, and as you can already tell yourself, without me even mentioning it, it will not apply if it’s not enabled.
The first text box is the “Method Title” if this is your usual method, name it something like Standard. Also, this is the title that’s going to appear on the checkout page. Adding a handling fee is optional, and if the text box remains blank, it will disable automatically. Set if the shipments are taxable or not, and then we can get into setting up the rules.
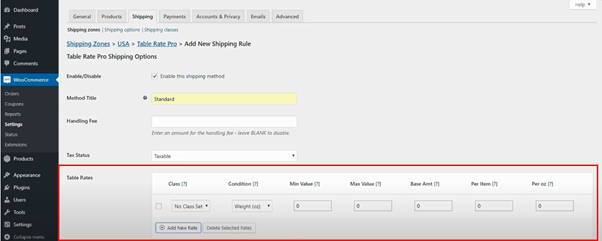
There are quite a few options in here, so we’ll give you a quick run-through of what they’re for and how they impact the shipping rules.
Possible tables rates:
- Shipping class – If you’re unfamiliar with this, you can go back to the knowledge base and learn more about them. But for this particular instance, we won’t be setting this up, so leave it as is.
- Condition – Here, you’re telling the plugin how it should apply the rule. There are three choices, weight, total price, and item count. Note that wight is expressed in Oz due to this shipping zone being in the US.
- Min and Max Value – Prety self-explanatory but denotes the total values of the products for which the rule is to be applied.
- Base Amount and Per Item – How much you’ll be charging as a base per order, and how much extra you’ll charge per item in the cart.
- Per Oz – If you add a rule based on weight, you’ll add how to charge per Oz.
So, now that we went over basics, so there’s no confusion. Go ahead and click on “Item Count” under Condition. Then set the minimum and the max value of the packages for which this rule will apply. If you want it to apply to all packages, enter “0” under minimum value and an asterisk (*) under Max Value.
The asterisk here denotes infinity. So the rule will apply no matter the cost of the products.
Next, enter your base charge and how much you want to add per each item. To avoid confusion, let’s use an example. If you set the base value to $3, the standard rate shipping will be three dollars. And if you set the per-item charge to $1, it will add one dollar to the shipping cost per item in the cart.
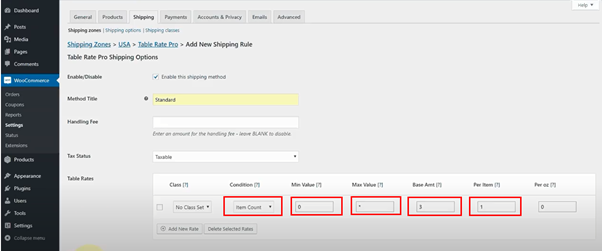
Once you’ve set everything up, save the changes, and that’s it.
To demonstrate, we’re going to pop by our store and what this all looks like when you are all done.
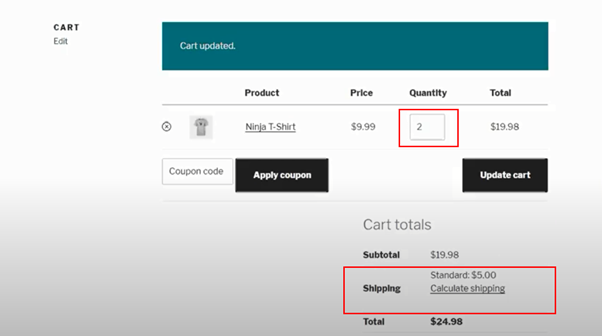
As you can see, there are two products in the cart, shipping is $5, and the name will appear directly next to the price, as we specified. Your per-item shipping rate is now complete.
Final Thoughts
Having solid shipping methods in place is a must-have for any successful e-commerce store out there. With Table Rate Shipping Pro, you can set up a per-item rule in mere minutes. Of course, this is only scratching the surface, as the plugin offers a whole host of features that’ll allow you to customize shipping to a tee.
Hopefully, our mini-tutorial was of some help to you, and you’re now ready to create your very own shipping rules—best of luck.


Comments are closed.