I find travel fascinating, and I have been traveling for as long as I can remember. It is exciting and inspiring to discover new countries, cultures, and beautiful places around our beautiful world.
Unfortunately, in these turbulent times, travel is limited due to the COVID-19 pandemic. It is better to stay safe at home at the moment. However, an alternative to physical travel can be to start a WordPress travel blog and thus discover the world but differently.
Those of you who use WordPress know that it is not easy to find a suitable theme because there are tons of themes available, both free and premium themes from all WordPress themes providers.
However, I decided to create a WordPress travel blog with a randomly selected free WordPress theme. In the WordPress theme repository, I searched for “travel,” and I came up with lots of attractive WordPress travel themes.
I just picked a random theme, and it turned out as Blossom Travel, a free WordPress travel blog theme from Blossom Themes which offers both free and premium WordPress themes.
So I rolled up my shirt sleeves and started my little project. Let’s see how I proceeded and how the result turned out.
How to Create a WordPress Travel Blog With the Blossom Travel Theme
Installation – Blossom Travel and Required Plugins
When it comes to installing Blossom Travel, it is the same principle as with all other WordPress themes.

In your WordPress dashboard, go to the Appearance tab in the menu on the right, click on the Themes tab. Add New, enter Blossom Travel in the search field. Click Install and finally Activate. You have now installed and activated the Blossom Travel theme.
If you want to download the theme for some reason, you can do it from the WordPress theme repository here.
If you want more information about installing the Blossom Travel, read the documentation – How to Install Blossom Travel Free WordPress Theme?
Furthermore – You are greeted with – Congratulations! Blossom Travel is now installed and ready to use. You can choose to read the theme documentation. See which plugins to install and other details by clicking on the button – Go to the Getting Started.
(Note -I advise you to read through manuals, guides, videos and more before you start using any theme or plugin).

The Getting started with Blossom Travel page is well organized. You find everything you need to get started with Blossom Travel under the tabs Recommended Plugins, Getting Started, FAQ’s & Support, Useful Plugins, Free Vs. Pro. You also have the opportunity to upgrade to the Pro version by Blossom Travel.
As you saw in the first picture – Congratulations! – Blossom Travel is now installed and ready to use. There are several WordPress plugins recommended for use with the Blossom Travel theme. So click the link – Begin installing plugins.

It takes you to the installation page of the required plugins. Select all the plugins in the tickbox, select Install, and click Apply. Wait, soon, you see that the plugins are installed successfully. Click – All installations have been completed. Select all the plugins, select Activate and Apply.
Shortly you see – The following plugins were successfully activated. BlossomThemes Email Newsletter, BlossomThemes Social Feed, BlossomThemes Toolkit, Contact Form 7, HTML5 Maps, Regenerate Thumbnails, and WooCommerce.
The installation of Blossom Travel and required plugins are complete. The installation of Blossom Travel and required plugins.
(Note – You do not need to install all the plugins unless you need them. Maybe not all users have use for, e.g., WooCommerce used for online shops).

I recommend you take a look at the settings and options for each plugin you have just installed. You find the settings to the left in the menu as you can see in the image above.
You can make your settings for, for example, connect your Instagram account, create a new Newsletter, HTML5 Maps, configure WooCommerce now or wait until later; the choice is yours.
(Note – I looked through all the plugins settings but chose to configure them later.)
Let’s continue and take a closer look at the theme itself.
Blossom Travel Theme Settings

If we look at the front page of my blog when I installed Blossom Travel, it doesn’t look very attractive (yet). However, it is just a first glance with basic settings, and we haven’t started with the customizations (yet). But let’s roll up the sleeves and get started with some customization.
As you have probably noticed by now, there is no theme options or theme options panel. You make all the customizations via the Live Customizer. All changes and configurations are in real-time.
To start the Customizer, you can do so via the menu on the left under Appearance – Customize. Or if you are on the front page of your website, you will find a Customize link in the left corner. Click any of the options to launch the Customizer.

If you have installed WordPress themes lately, you are probably familiar with the Customizer. It is where all the fun happens! Let’s take at walk-trough on what tabs and content are available in the Blossom Travel theme (free version).
- Pro Available – If you wish, you can update the Blossom Travel to a Pro version.
- Demo and Documentation – The title is pretty self-explanatory. Under this tab, you find links to demo, documentation, and video about this theme.
- Site Identity – Under this tab, you can upload a logo, add site title, add a catchy tagline, and a site icon.
- Appearance settings – You can choose the primary and secondary font, add a background image, and customize colors.
- Layout Settings – Through this tab, you can select which header layout you want to use. There are two options to choose from. Furthermore, select page sidebar layout, post sidebar layout, and default sidebar layout.

- Banner Settings – Choose static image or video banner. It is also possible to add an eye-catching header video.
- Front Page Settings – This is a tab where you can add which sections you want to use on the front page. For example, there are – Client Logo, About, Featured, Blog, Map, Call To Action, Newsletter, Instagram sections that you add as widgets. Here you can create an attractive and informative front page.
- General Settings. Under the General Settings tab, you can customize Header settings, background image, Social media, SEO, and Posts (blog) and pages settings.

- Menus – Create or add a menu. In the free version, only one menu location is available.
- Widgets – Here, you can add optional widgets with different features in the Sidebar, and in the Footer.
- Homepage Settings – Choose whether you want to display your latest posts or a static page.
- Footer Settings – Here you can add a Footer copyright text such as © Copyright 2020. All Rights Reserved WP Pluginsify. You can also use HTML text to add links.
- WooCommerce – For those who want to use WooCommerce to sell items, services, anything else can edit the settings for Store notice, Product Catalog, Product images, Checkout, and more.

- Additional CSS – If you feel brave or have knowledge of CSS can add custom CSS code.
Blossom Travel Customization
My intension is to create an excellent travel blog with Blossom Travel. Since my installation is clean, I need to create everything from scratch, such as customization of the design, blog posts, pages, and finally a shop, to have something to present.
Categories – The first thing I do is create some categories with beautiful countries around our world.

Furthermore, I created some blog posts and pages with suitable images from Pixabay and Unsplash that provide free images you can use for your websites.

The pages I created are the following About us and a Contact page using the Contact Form 7 plugin that I initially installed.

Menu – Time to create a menu that is a navigation bar for visitors. You can create menus via the Customizer or the dashboard, Appearance – Menus. I choose to create my menu via the customizer you see in the picture below.

Create and add the categories, pages, and more you want to present on the menu as a navigation to your visitors.

Moreover, I also added a new Header image perfect for a vacation trip. Furthermore, I changed the website colors via the customizer to suit my taste.
I also went through all the tabs in the customizer and made small adjustments where needed. It is a flexible theme with many configuration options so it might take a while!
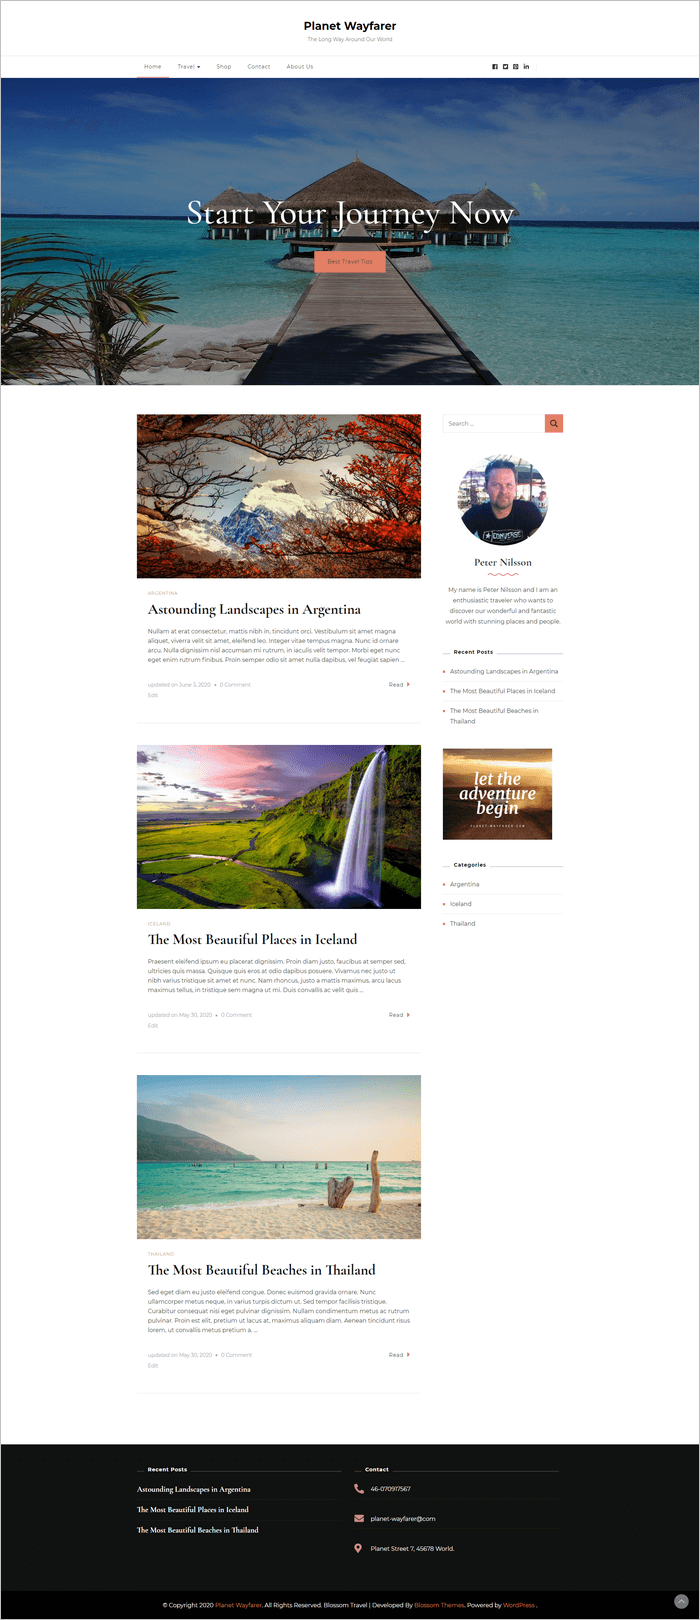
Take a look at how my WordPress travel blog named Planet Wayfarer turned out below. As I mentioned before, I wanted to create a travel website with a clean look and feel. I am more than happy with the result. What do you think?
Setting Up the Shop
My idea is also to set up an online shop using the WooCommerce plugin, which I initially installed.
Before we go any further, I want to point out that my shop will be installed with minimal features.
Furthermore, I recommend you read on how to set up a shop in Woocommerce. There are many tutorials available, but this guide – How to Set Up a New WooCommerce Store from WooCommerce works great to get you started.

First, I need a specific page on which my shop should be located. So I create a new empty page called – Shop. Then I need to point out which page I should use for the shop in WooCommerce. Go to WooCommerce – Settings – Products – point out your shop page and save.

Let’s take a look at what my shop currently looks like.
As you can see, my shop looks pretty empty at the moment. So I need some products to present to visitors. Since it is a travel website, I will recommend and offer travel books.
I’m adding some products via the WooCommerce – Products – Add New tab in my dashboard.

When ready, my shop looks like this.
Minimalistic, however, I like the look and feel.
I set up the shop with the simplest means, and you can, of course, use all the great features in WooCommer as payment, shipping, and more if needed.
In Conclusion
I’m done building my WordPress travel blog even though you can choose to customize the theme much more. There are many features, options, and custom widgets available.
However, because I like the minimalist style, I chose a clean design, but you can style your site according to your liking and needs.
I am very happy with the design and layout of my travel blog.
Blossom Travel is a flexible WordPress theme from Blossom Themes and it comes with various opportunities to create a pleasant and attractive travel website. However, you can easily use the theme for any kind of blog.
The final word is that I like the Blossom Travel theme very much. It is easy to build an attractive website with a great look and feel.
If you want additional features and support, there is also a premium version available – Blossom Travel Pro.
Good luck with building your new travel website with the Blossom Travel WordPress theme.
Disclosure: We sometimes use affiliate links in our content. Some of the links in this post are “affiliate links.” This means if you click on the link and purchase the item, we will receive an affiliate commission. It helps our website keep on running and helps us to offset the cost of our writing team. Thanks for your support.

Comments are closed.