Ever since the “Four Hour Work Week” came out, everyone wants to be an affiliate marketer. However, in order to be successful at affiliate marketing, one has to first become a successful blogger.
When you search “how to be a successful blogger” on Google, you will get about a thousand different articles talking about SEO and the importance of great content.
When most people think of content, they think of written content like articles and blog posts. What most of us forget is that even videos and images are content. In fact, visual content is some of the most shared content on the Internet.
Over on Facebook, about 8 billion videos were watched on an average day in 2016.
Similarly, another study reported that infographics are the most shared form of content on social media, 3x more than any other content type. At a time when we are consuming more content than ever before, putting across your message in an engaging and quick manner has become the need of the hour.
Since our brain processes visual content faster than written content, making use of videos and images on your blog has almost become mandatory for success.
Not to forget, visual content is even advantageous from the SEO point-of-view- search results containing videos are not only displayed at the top of the SERP. But these results also have a 41% higher click-through rate!
If you are a budding blogger, visual content is going to play a crucial role in your journey to success. In this guide, you will learn everything there is to know about adding visual content to your WordPress blog.
Adding Images to Your WordPress Blog
Adding images to a WordPress blog post is a relatively straightforward process:
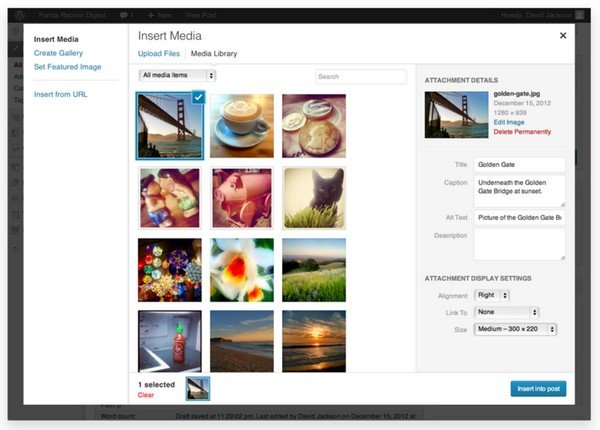
– Determine where in your post would you like to insert the image. Place your cursor at that point and click on the “Add Media” button above the post editor toolbar.
– A box will appear on your screen, this is your Media Box. To upload an image, click on the “Select Files” button, choose the image you would like to upload and click “Open”.
– Once the upload is complete, the image will be displayed in your Media Box or library. When you select the image, you will be able to change the title, caption, alt text, and description of the image on the right side of the box.
– Next, while the image is still selected, click the “Insert Into Post” button.
– Once the image is added to the post, you can make further edits directly. When you click on the image within the post, you will see two options appear at the top of the image. When you click on the box on the left, another box containing editing options will appear. Here, you can resize the image, change the link attached to the image.
Uploading Several Images
Uploading a single image is a pretty straightforward task. However, when you have a website with hundreds of pages and (hopefully) even more images to deal with, things start getting a little tricky. Moreover, not all of us are Photoshop professionals and require simpler tools to work on edits.
For this reason, it is advisable to make use of plugins while dealing with images in WordPress. For instance. DigiWidgets enables you to make basic edits to your images and even keeps a history for when you want to revert back to an older version.
Similarly, another plugin called the Post Thumbnail Editor does exactly what the name suggests. It’s quite a handy tool when it comes to making sure your thumbnails look perfect.
By now, you should fully understand how images can be added to your WordPress posts. Next, let’s talk about videos.
Adding Videos to A WordPress Post
Not too long ago, uploading a video to your WordPress blog was a challenging task. Format incompatibility and server issues were common roadblocks that the platform has now overcome in their latest updates.
Uploading a video to a WordPress post has now become relatively easier, and can be done in several ways. Here, we list the two most convenient ways to upload a video to your WordPress blog:
WordPress Embeds
If the video you wish to include is already present on the World Wide Web, WordPress Embeds is possibly the easiest way to include them in your posts. All you need to do is copy the URL of the video and paste it wherever you intend for the video to appear within your content. The video will automatically be included as playable media within the post.
This method works with videos on all major platforms such as YouTube, Vimeo, WordPress.tv, and SlideShare, among numerous others.
Note: The above-mentioned method will only work flawlessly if you have the latest update of WordPress. Many websites don’t work with the older version and may result in faulty uploads with broken links which can be extremely frustrating to your audiences.
Plugins
If your objective is to upload multiple videos and/or create multiple playlists, making use of plugins is the easiest way forward.
Editors that are picky about video player design and want to put a substantial focus on their video content are advised to go for premium options such as the VideoPress. Since the plugin for specifically designed for the WordPress platform. It offers a variety of convenient features such as drag-and-drop upload and advanced privacy controls among many others.
On the other hand, if videos are going to be a once-in-a-while affair for you. There are a few free options available online. While plugins like the Cool Video Gallery may not offer advanced options like their premium counterparts. They are still loaded with useful features that allow you to upload and attach videos from other websites.
Our example, Cool Video Gallery supports most video formats and makes managing, uploading, and deleting videos easier.
Uploading Videos Directly To WordPress
If you are thinking of uploading your videos directly, it might not be the best idea. While doing so is again a pretty straightforward process, most WordPress sites are hosted on shared servers which may crash the day your website starts attracting a lot of traffic.
Conclusion
Uploading videos to WordPress may have been a challenge in the past. But thanks to updates and plugins, editors can now take complete advantage of visual media without any hassle.
How do you plan to use visual content on your blog?


Comments are closed.